
Could you post a little more about your home-built one? At the prices I've seen online, I'd like that option.I have 2 grain crushers a Corona Style a home built simmilar to a Crankinstine but bigger. The roler is 4 1/2 inches in Dia and 14" long The hoper can hold 40 lbs. Both rollers are driven buy a seris of gears. A friend built a roller mill about the size of the phill mill. One roller is driven the other is opperated as grain is fed through by friction between the rollers he has trouble with feeding if the roller gums up from grain dust.


Equipment Question - Grain Crushers
Started by
japh
, Mar 27 2009 09:37 PM
54 replies to this topic
#41

japh
-

- Patron
-

- 14976 posts
Winner!
- LocationOregon
Posted 30 March 2009 - 09:53 AM
#42
TonyBrown
-

- Members
-
- 87573 posts
Comptroller of C-Blocking and Wet Streak Marks
- LocationRedneckistan
Posted 30 March 2009 - 10:23 AM
you's guys with all your fancy crusher rigs... I use a Barley Crusher, a drill and a 5gal bucket... for the money the BC is the best out there, imho...
#43
BFB
-

- Patron
-
- 10827 posts
Wind Whisperer
- LocationWisconsin
Posted 30 March 2009 - 10:28 AM
Yup...I'd motorize mine but then I would need more space to store it. Now it tucks away nicely on the shelf under my brew bench. I find it very handy to pull it out, set it on a bucket, attach the drill and crush away.you's guys with all your fancy crusher rigs... I use a Barley Crusher, a drill and a 5gal bucket... for the money the BC is the best out there, imho...
#44
rockon
-

- Members
-
- 2666 posts
Frequent Member
- LocationMichigan
Posted 30 March 2009 - 10:58 AM
+1Yup...I'd motorize mine but then I would need more space to store it. Now it tucks away nicely on the shelf under my brew bench. I find it very handy to pull it out, set it on a bucket, attach the drill and crush away.
#45
boo boo
-

- Members
-
- 150 posts
Advanced Member
- LocationHeart's Delight, Newfoundland
Posted 30 March 2009 - 03:29 PM
I use a Porkert and am satisfied to the point where I don't want to spend any money to get a roller mill.Perhaps down the road I'll get a mill, but for now.......Am I the only one on this board using a Corona mill?And I am actually perfectly content with it.

#47
Brewmasters Warehouse
-

- Members
-
- 62 posts
Member
Posted 31 March 2009 - 05:33 AM
I use a Barley Crusher and love it. I get great efficency from the crush, it just great for the money. I have not really seen too many complaints ever about any mill, that is not a corona style mill.Edi have the CRANKANDSTEIN 2S. constructed a hopper system for it and a metal chute. the hopper will hold around 50 lbs of grain and i use a ryobi hammer drill to power it. runs through grain in minutes. S3
#48
rockon
-
- Members
-
- 2666 posts
Frequent Member
- LocationMichigan
Posted 31 March 2009 - 05:54 AM
I have ameat grinder called a Porkert. Always thought the name was funny. I guess they also make a corona-style mill? I doubt you're crushing with a meat grinder.I use a Porkert and am satisfied to the point where I don't want to spend any money to get a roller mill.Perhaps down the road I'll get a mill, but for now.......
#49
japh
-
- Patron
-
- 14976 posts
Winner!
- LocationOregon
Posted 31 March 2009 - 11:14 AM
So, I've seen the following mills on this list:DIYCoronaBarley CrusherPhilMillMonster MillCrank-n-steinJSP MaltMillGrain Gobbler (not suggested in this thread, but I found it online)
#50
awall
-

- Members
-
- 10394 posts
Comptroller of Being a Cool Dude
- LocationRowley
Posted 31 March 2009 - 11:19 AM
i have a maltmill, if i had a do-over, i'd have bought a barley crusher with the nice big hopper.
#51
MetlGuy
-

- Members
-
- 24 posts
Member
- LocationYork, SC
Posted 31 March 2009 - 07:21 PM
I have a MM-2 with the 1/2 inch shaft. First run was 85% with corded drill. I have to get the sheaves for the motor soon. My drill is old and is about to die.I have copied ChefLamont's review hereWell I finally got a chance to really take the Monster Mill for a test drive yesterday, so I can now share a full review of my experiences with it.Initial ImpressionI have to say again, that when Fred first handed me the box with the mill in it, my very first impression was, "holy crap this thing is heavy for a two-roller mill." I later weighed it, and it is right at 7.5 pounds.As you could see in the pictures I posted previously, the fit and finish is outstanding. It is a great looking mill. That really doesn't affect the performance of course, but it is nice, when you are laying down a fair amount of hard-earned cash, to get something that really looks good.As I was handling the mill for the first time, I did notice a few metal flecks coming from the rollers. They were obviously remnants of the knurling process. I really didn't see this as a big deal since I (as every brewer probably should) inspect, clean and test every piece of equipment before it gets put into real service in the brewery.Beyond the little flecks, I did notice that the mill was very clean. There was no cutting oil or grease remnants on it. I did remember some oil being on my C&S when I first got it. Fred has told me though that he will probably start putting a little light canola oil on the rollers to reduce any possibility of rust. Like I said though, cutting oil, canola oil, or whatever is academic because any mill should be cleaned before use anyway.Mounting the MillSince I am not keeping and using the mill permanently, I decided to use a really simple mount. I documented how I built the mount not only so you can see what I did but also so anyone interested in doing a simple mount with simple tools can do the same thing or similar. The basic idea of the mount was to attach the mill to the bottom of a piece of 3/4" MDF. This is how my C&S is mounted and so I can just use the same hopper.So the first thing I did was to take the MDF and place the mill on it with the bolts down. I made sure that the mill was square and the rollers spun freely, and then I traced around the heads of the bolts.I think this is a good place to pause and answer (or try to understand) whodatpat's question about the bolt pattern. The bushings on the mill have a very little bit of slop designed into them, a few 1/10,000s I think. Because of that you dont have to get the holes laser-ninja dead on. There is a (very) little room to play with. Plus the way I mount it, also provides a little forgiveness. My C&S was exactly the same way with a little slop in the bushings to make mounting without binding the rollers easier.So, as I mentioned, I put the mill down with the bolts down and traced around the heads of the bolts.Then I drilled holes where the trace marks are. Here is the important point. I drilled the holes larger than the bolts so there is plenty of room to wiggle them around later.With the holes drilled, I temporarily mounted the mill to the board. I then drew lines down the outside edges of the rollers. You can faintly see it in the above picture.With those outside lines drawn, I then drew a center line equidistant from those two lines. Then used the center line to draw the lines for where the slot would be cut. I wanted a 1" wide feed slot, so I measured it 1/2" off each side of the center line. The above picture shows this.Then I cut the slot by simply drilling 1/2" holes in opposing corners and using a jig saw to cut along the lines. This was the most technical part of the build and was a cinch.I then flipped the mill over. You can see the top of the bar clamp in the back of the picture. All I did was clamp the piece of MDF to the table of my table saw. The little guides on the top are to hold the hopper that I already use on my C&S. I wont say much more about this, because it gets into my specific design and there are even more ways to skin the hopper cat.Discussion on GapBefore we get too much further, I suppose I should talk about gap. When I picked up the mill, Fred told me they were preset to 0.045. I of course checked that and sure enough, it was dead on 0.045.For the purposes of my testing I wanted to do a "reasonable" gap and get a "reasonable" crush, and I wanted to do more of a "crush till your scared" type gap. Understand that there is no magic number for the and that there are many different factors that affect the pursuit of the perfect crush such as speed you mill at, size of the grain itself, tolerance of you laudering system and so on. Therefore, my gap choices were pretty much arbitrary. When you get your mill, it would be best to plan to sacrifice a few pounds of cheap base malt (you know, the stuff that is laying around having you wonder if it is still good) to determine your most desirable gap.Anyhow, I decided for the reasonable number to use 0.041 and for the scared number 0.037. I ended up also running a batch at 0.033, but more on that in a minute. As for the ease of setting the gap, it could not be easier. If it takes you more than 30 seconds, you are doing something wrong. So, there is no excuse for checking, resetting, and adjusting the gap as much as necessary.The TestFor the tests, I ran about 1 pound of German Pilsener Malt through the mill. As you can see from the pictures above, I used my Dewalt 14.4V cordless drill with a freshly charged battery. In my opinion, I wouldn't show up to the battle with much less than this. The 14.4V did fine, but if I was crushing a large grain bill, it would probably be hurtin. It would probably be better to use a decent corded drill and not a little weenie one either. I have never milled with a drill (my C&S is motorized) but I think that is the general consensus with all of the mills powered with drills.As previously mentioned, I started with a gap of 0.041. I ran a batch of grain. Reset the gap to 0.037 and ran another batch. At that point, I was not scared so I set it down to 0.033 and ran another. In the end, I ran about 5 batches through (a couple of brain farts on my part).The ResultsI have to say the results were interesting. At the 0.041 setting, the crush was in a word, "beautiful!" A lot of the husks were either hole or torn in half. There was not an intact grain anywhere that I could find. There was some but very limited shredding of the husks. The insides were broken up but not flour. I would call it a complete crush.The really interesting thing was that the 0.037 and 0.033 crushes were basically identical. There was more shredding of the husks and more flour from the insides. I would not call the shredding excessive though. I could even be convinced to gap it down further and see what happens. However, the crush I got at these settings is pretty close to what I would use when I brew and get in the 80-85% efficiency range.As for the performance of the mill itself, it performed really well. It fed well and the rollers were always smooth.I had only one slight issue. There were two of the five batches that after running, I reached under there and one of the two thumb screws (but not the same one each time) was loose. I have to believe this is because i am being VERY gentle with the mill since it is not mine and I am giving it back. Also, after discussing it with Fred, he suggested making sure I turned the set knob a certain way when I set it. That would make the set screws even less likely to loosen. If I have some time this week, I might try a couple more runs with that advice.ConclusionTo sum it all up, I have to say, this is an outstanding mill. It looks nice, and better yet it performs like a real champ. Am I going to throw away my C&S 3-roller for this baby? No....not hardly. But if my C&S went away for some reason and I was in the market again, I would not even hesitate to spend the money to get this mill. It is an incredible piece of brewing hardware that should last till your great-grandkids are brewing.
#52
Stout_fan
-

- Patron
-
- 3115 posts
Frequent Member
- LocationKnoxville, TN
Posted 02 April 2009 - 04:53 AM
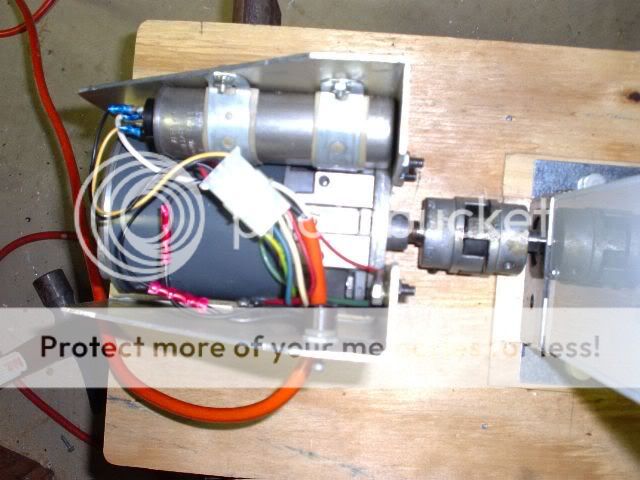
Like Alpha, I also have a Valley Mill
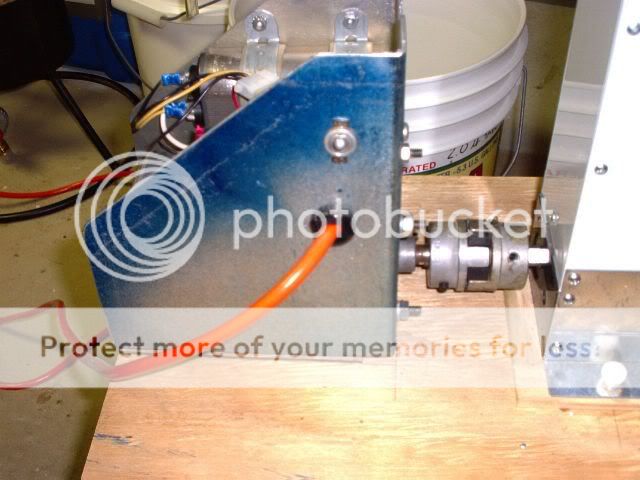 https://img.photobuc...ng/Mill_top.jpgBeen working great for over 3 years now.
https://img.photobuc...ng/Mill_top.jpgBeen working great for over 3 years now.
#53
japh
-
- Patron
-
- 14976 posts
Winner!
- LocationOregon
Posted 02 April 2009 - 08:24 AM
Do you know if they have a web site? Google search for Valley Mill only turns up various companies with both 'mill' and 'valley' in their name (of which there are plenty).Like Alpha, I also have a Valley MillBeen working great for over 3 years now.
#54
Mindblock
-

- Members
-
- 494 posts
Advanced Member
- LocationWisconsin
Posted 02 April 2009 - 10:59 AM
Add me to the list of happy Barley Crusher owners.I got it with the 15lb hopper.....took it out of the box, put it on a 5 gallon bucket, slapped a 1/2" corded drill on it and started crushing the 22.5lb of grain for the Quiet Storm Stout brew last weekend. Nothing could be easier, but based upon my experience in this first outing, I WILL need to recalculate my brewhouse efficiency because this crush appeared to have rather dramatically positive effect on the ~75% efficiency I was getting.I have yet to hear anybody complain about their Barley Crusher
#55
Lagerdemain
-
- Members
-
- 148 posts
Advanced Member
Posted 02 April 2009 - 11:11 AM
I believe Valley mills haven't been made for about two years now. If I remember correctly, they were only sold by St. Pat's - and probably when St. Pat's elected to stop selling homebrew equipment, the Valley mill had no home.Do you know if they have a web site? Google search for Valley Mill only turns up various companies with both 'mill' and 'valley' in their name (of which there are plenty).
0 user(s) are reading this topic
0 members, 0 guests, 0 anonymous users

