


Sparging Manifold
Started by
KSUwildcatFAN
, Sep 30 2009 09:21 AM
25 replies to this topic
#1

KSUwildcatFAN
-
- Members
-

- 9180 posts
Comptroller of ChopSticks & Ghey Bach Chow
- LocationKC Area
Posted 30 September 2009 - 09:21 AM
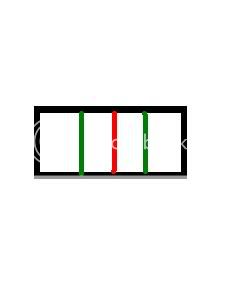
OK, tonight I'll be putting together a cpvc manifold for both the drip and for under the grain. I'm sure I can figure out the appropriate amount of holes to drill for the drip, but should I use holes or slices and how many (per inch total whatever)? What size/width should the hole/slice be? It will look like the one below. Either:Just blackBlack+RedorBlack+Green
#2
MtnBrewer
-

- Moderators
-
- 6695 posts
Skynet Architect
- LocationThe Springs
Posted 30 September 2009 - 09:47 AM
Before you go any further, read this if you haven't already. Now, on to your questions...
- [*]I'd go with black + green with the connection to the drain from one of the green legs. Or black + green + red with the drain connection from the red leg. More drainage == better.[*]I would use slots. As many and as narrow as you can. For mine, I used a Dremel cut off wheel (actually a great many of them) to cut the slots. They are too narrow for grain bits to pass through but they allow more flow than holes.[*]For the sparge manifold, I would use holes -- the tiniest ones you can make. Again, I used a Dremel with an itty bitty little drill bit. Seriously, it's like the size of a hair. The reason is that if the holes are too large, all of the hot liquor is going to go through the first few holes and very little through the others. It doesn't really matter that much how many holes you make, just space them out evenly. I drilled some of the holes through the side of the pipe so that the spray pattern wouldn't just look like a grid. I tried to make it so that the entire surface of the mash gets sprinkled evenly.[/list]
#3
Kremer
-

- Patron
-
- 9173 posts
Comptroller of MS Paint Diagrams and other vague unspecified stu
- Location38.360502, -85.311022 (Louisville, KY area)
Posted 30 September 2009 - 10:37 AM
If you have access to a band saw they are ideal for making the slots.
#4
tag
-

- Members
-
- 1209 posts
Frequent Member
- LocationDenver
Posted 30 September 2009 - 11:21 AM
Or try it without a manifold. I just lay the hose on top of the grain bed.YMMV
#5
jayb151
-

- Members
-
- 1137 posts
Frequent Member
- LocationBatavia
Posted 30 September 2009 - 11:23 AM
I agree with MtnBrewer completely. If I had really thought through it when I did mine I would have sloted the MT manifold instead of drilling holes. To expand what he said, you want the "legs" of the manifold to be evenly spaced from eachother and half that distance from the wall. If you have Palmer's How to Brew, there's a great ilistration on page 293 (fig 189). If you don't have the book (which you should get) then I'll explain it like this. Say your tun is 12 inches across and you have your "black and red" design. It would be 8 inches wide. That way there would be two inches from wall to outer leg, 4 inches from outer leg to middle leg, 4 inches from middle leg to other outer leg, and 2 inches from other outer leg to other wall. Does that make sense?I hope so.Edit: Oh, I forgot. The more legs, the better!
#6
KSUwildcatFAN
-
- Members
-
- 9180 posts
Comptroller of ChopSticks & Ghey Bach Chow
- LocationKC Area
Posted 30 September 2009 - 12:55 PM
Thanks fellas, I think I got it. Bummer for me about not having a bandsaw, I'll be doing it w/ a hacksaw instead. Should go pretty fast even still, hopefully.
#7
MtnBrewer
-
- Moderators
-
- 6695 posts
Skynet Architect
- LocationThe Springs
Posted 30 September 2009 - 01:04 PM
See, that's why I posted the link -- so that I wouldn't have to 'splain something that John already explained better than I could.Does that make sense?I hope so.

#8
Deerslyr
-

- Patron
-
- 23807 posts
Disliker of Nut Kicking
- LocationGod's Country!
Posted 30 September 2009 - 01:41 PM
It's a workout with the hacksaw, but does just fine. I built one with 4 courses. Works just fine. Cpvc is easy to work with. Oh, you don't need to glue all of the pieces together, but you do need to glue some. It's just easier to clean if you can take it apart a bit.Thanks fellas, I think I got it. Bummer for me about not having a bandsaw, I'll be doing it w/ a hacksaw instead. Should go pretty fast even still, hopefully.
#9
djinkc
-

- Patron
-
- 32138 posts
Comptroller of Non-Defending Defenders of Inarticulate Twats
- Locationout the backdoor
Posted 30 September 2009 - 01:44 PM
FWIW I used a jigsaw on the manifold (copper though) it ripped through it pretty fast. Not pretty but effective.....
#10
siouxbrewer
-

- Members
-
- 8253 posts
Comptroller of Teh Beefs and other beeflike animals that are tas
- LocationGreat Plains, KS
Posted 30 September 2009 - 02:46 PM
Hacksaw works fine, it did for me anyway, but takes a bit of elbow grease. If you go this route you will have to take off the burrs with a piece of folded sandpaper. Run it through each of the slots until they are smooth, otherwise you may have tiny shards of copper in your beer and/or colon
#11
Deerslyr
-
- Patron
-
- 23807 posts
Disliker of Nut Kicking
- LocationGod's Country!
Posted 30 September 2009 - 03:09 PM
He's using CPVC, which should pass right through.Hacksaw works fine, it did for me anyway, but takes a bit of elbow grease. If you go this route you will have to take off the burrs with a piece of folded sandpaper. Run it through each of the slots until they are smooth, otherwise you may have tiny shards of copper in your beer and/or colon
#12
siouxbrewer
-
- Members
-
- 8253 posts
Comptroller of Teh Beefs and other beeflike animals that are tas
- LocationGreat Plains, KS
Posted 30 September 2009 - 03:17 PM
Ha! Well I hope everything comes out alrightHe's using CPVC, which should pass right through.

#13
jayb151
-
- Members
-
- 1137 posts
Frequent Member
- LocationBatavia
Posted 30 September 2009 - 03:36 PM
See, that's why I posted the link -- so that I wouldn't have to 'splain something that John already explained better than I could.
Oh! stupid me, I didn't notice the "Next Page" button!
#14
KSUwildcatFAN
-
- Members
-
- 9180 posts
Comptroller of ChopSticks & Ghey Bach Chow
- LocationKC Area
Posted 02 October 2009 - 06:37 AM
Ended up doing black and red w/ only the long black runs having slits. After looking at the dimensions at scale, I don't think there's a real need for more. 5" large gap w/ 2.5" between the cooler wall and manifold. The hose will connect to the red bar in the center. I'll be finishing up my brew sculpture tonight (I hope) and will start a thread showing my completed setup.
#15
djinkc
-
- Patron
-
- 32138 posts
Comptroller of Non-Defending Defenders of Inarticulate Twats
- Locationout the backdoor
Posted 02 October 2009 - 06:40 AM
What cooler are you using?Ended up doing black and red w/ only the long black runs having slits. After looking at the dimensions at scale, I don't think there's a real need for more. 5" large gap w/ 2.5" between the cooler wall and manifold. The hose will connect to the red bar in the center. I'll be finishing up my brew sculpture tonight (I hope) and will start a thread showing my completed setup.
#17
djinkc
-
- Patron
-
- 32138 posts
Comptroller of Non-Defending Defenders of Inarticulate Twats
- Locationout the backdoor
Posted 02 October 2009 - 06:52 AM
Same cooler here, I hard plumbed (copper) one of the black legs (just a friction fit so it's removable) straight to the drain valve. It keeps the manifold in place when I stir the mash. I'm sure a hose will work but I would think it would get in the way.A 70 quart Coleman. It's the one Zymo (I think) uses here.
#18
KSUwildcatFAN
-
- Members
-
- 9180 posts
Comptroller of ChopSticks & Ghey Bach Chow
- LocationKC Area
Posted 02 October 2009 - 07:08 AM
My manifold is slightly different than the pic I drew. The transverse pieces at the corners actually extend to the wall and are joined by the longer w/ T's. This will keep it from moving that way and the long way is virtually the complete distance from wall to wall, with a little room. It fits pretty snug. I bent the transverse piece on the drainage end to go up and over the hose barb, and the cooler has the indention for the hose to lie in. Pics are worth a 1000 words, so I'll post them sometime tonight or tomorrow.BTW - should I sand off the writing on the outside of the CPVC? That ink was never intended to be in contact w/ water, hot or cold.Same cooler here, I hard plumbed (copper) one of the black legs (just a friction fit so it's removable) straight to the drain valve. It keeps the manifold in place when I stir the mash. I'm sure a hose will work but I would think it would get in the way.
#19
djinkc
-
- Patron
-
- 32138 posts
Comptroller of Non-Defending Defenders of Inarticulate Twats
- Locationout the backdoor
Posted 02 October 2009 - 07:28 AM
If those end pieces are slotted and against the wall they'll promote channeling down the cooler wall when fly sparging. I'd try to keep them the same distance from the wall as the longer pieces. Dunno about the printing - I'd probably sand it off or use solvent.the long way is virtually the complete distance from wall to wall, with a little room. It fits pretty snug. ........
#20
KSUwildcatFAN
-
- Members
-
- 9180 posts
Comptroller of ChopSticks & Ghey Bach Chow
- LocationKC Area
Posted 02 October 2009 - 07:37 AM
Will do, and since there is the transverse pipe width, plus added distance from T and then some gap, I'm pretty sure that my first cut would be no more than 2.5" from the wall. I will check to make sure.If those end pieces are slotted and against the wall they'll promote channeling down the cooler wall when fly sparging. I'd try to keep them the same distance from the wall as the longer pieces. Dunno about the printing - I'd probably sand it off or use solvent.
0 user(s) are reading this topic
0 members, 0 guests, 0 anonymous users

